Pipe Restoration: a Skill Often Neglected by the Tobacconist
by Thomas C. Wolfe
©1982 T.C. Wolfe
 A customer
walks into your shop and tells you that he just inherited a collection of old
pipes from a relative. "What do I do to make them smokable?" he asks.
You tell him how to use pipe sweetener and (if you're good at your job) you
offer to polish the old bits for him. He leaves with pipe cleaners and a bottle
of sweetener. You feel good. You made a sale and helped a customer, but have
you really helped him? Actually, you've just let opportunity walk out the door.
Most pipe smokers have neither the time, nor the skill, to be able to restore
pipes to their best smoking condition and their original beauty. The tars and
oils, in a pipe that hasn't been smoked for years, will resist the best efforts
to remove them with just sweetener. Neglected pipes will show signs of finish
wear that can't just be glossed over with a polishing cloth. In spite of your
good intentions, that customer of yours will probably never get full smoking
enjoyment out of those pipes.
Every tobacconist should be knowledgeable in
the art of pipe restoration. He should be able to thoroughly clean out a pipe .
. . far better than just using pipe sweetener. Polishing bits and reaming
bowls, of course, comes with the job. Just how thorough are you, when you are
cleaning shanks? And what about the bowl? Buffing with carnauba wax won't help
much if the stain has worn off. You may just windup turning a Comoy Golden
Grain into a natural.
Pipe restoration can be broken down into
three basic subjects: cleaning, refinishing, and repair.
Let's discuss cleaning
first, since you are probably familiar with it. Most shops have a buffing wheel
for polishing bits and bowls. If your shop doesn't have one you're not
providing full service to our customer. You can make a good buffer for about
$50 from a used 1/4 hp. washing machine motor, and parts from a hardware store.
You can prevent your shop from filling with dust by adding a vent hood made
from plywood (or sheet metal) and a small shop vacuum. I highly recommend Sears
All-Purpose buffing compound for polishing both bits and it's the best on the
market -- bar none!
A difficult part of buffing stems is
cleaning the oxidation that forms near the lip. Buff too hard and you’ll
round the lip (perhaps even burning the vulcanite). Use a sharp knife to
lightly scrape off the heavy oxidation that forms near the lip, then buff as
usual. You will save wear and tear on bits this way. You can prevent the bit
from rapidly oxidizing by buffing the polished bit with a light coat of
carnauba wax.
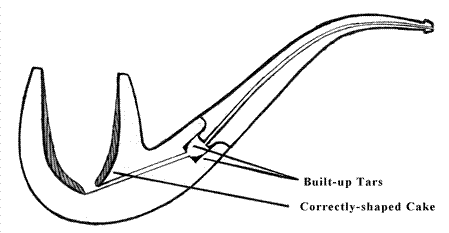
Cleaning the shank is rarely done properly.
Pipe cleaners or a Bristle brush (even with sweetener) will rarely get all of
the tar buildup found at the very end of the mortise hole. (Fig.1) 
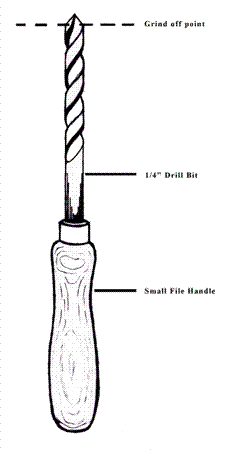
You can make a highly effective shank reamer
by grinding the tip off a 1/4" drill bit square. Mount the drill shank in
a small file handle, and you're ready to go. (Fig. 2)
To thoroughly clean and sterilize the inside
of a pipe, ordinary pipe sweetener just doesn't cut the cake. For you
disbelievers, clean out one of your own pipes with sweetener, then try the
boiling alcohol method on that "clean" pipe. You just won't believe
the junk that will come out! To clean a pipe with boiling alcohol, you will
need two simple tools: an alcohol lamp and a small retort. Figures3 and 4 show
you how to make them both for only a few cents. Many hobby shops that carry
chemistry sets can provide you with quality retorts and alcohol lamps.
The choice of alcohol is important. Use
either wood alcohol (methanol) or denatured alcohol for best results. Rubbing
alcohol doesn't work well. [Pure grain alcohol (ethanol) is perfect if you can find it. It's available in some states under the brand name of EverClear. - TW]
Fill the retort with alcohol about two-thirds
full. Attach the tubing over the pipe's bit. (A 1/4" slit in the surgical
tubing; will make it easier to fit onto pipe bits.) To prevent the alcohol from
damaging the bowl's finish, Place a small cotton ball in the mouth of the bowl.
Pass the retort slowly back and forth over
the flame. As the alcohol boils up into the pipe, remove the retort from the
flame. As the retort cools, the alcohol will be sucked out of the pipe and into
the retort. By repeated heating and cooling the retort, you can flush the pipe
with boiling alcohol several times. Once the alcohol turns black with tar,
replace it with some fresh liquid. After about a dozen flushes, remove the
retort and clean the pipe with `bristle cleaners or a nylon brush. Let the pipe
dry out at least six hours before smoking. You’ll be utterly amazed at
how well the pipe will smoke.
Pipe repair is one part of restoration that
should be left to the repair shop. Although some repair shops offer full
restoration services, even they can sometimes make matters worse.
How many times have you had a customer
complain that the repair shop gave their pipe a two-tone shank? What has
happened is that the repairman turned down the shank to fit the bit, instead of
vice versa. Normally, then will turn an oversize bit down to match the contours
of the outside of the shank. But sometimes they are forced to turn down the
shank because they don't have a large enough bit in stock. Even the best of
repair shops (including Dunhill's in NY) have been known to do this on
occasion, but if this happens often, then find another repair shop.

So here you are with this two-tone shank and an
angry customer on your hands. What will you do? You can and should complain to
the repair shop, but returning the pipe means another long delay for your
customer. If you pick up an item from a shoe repair shop, you can have it ready
for him the next day. (Yes, I did say shoe repair.)
It seems that a long kept secret of
some pipe repair shops is using shoe dye to touch up their mistakes. Lightly
stain the shank with the dye. Let it dry, then buff to match the pipe’s
finish. Stain the wood too dark? A little alcohol on a cloth will lighten it
up.
Shoe leather dye (not shoe polish) is virtually
identical to the alcohol-based wood stains used by Pipe manufacturers. Unlike
wood stains found in hardware stores, shoe dye does not cover up the grain of
the wood, it enhances it. Most shoe repair shops carry dyes in dark brown
(walnut), Brown (rosewood), Light Brown (mahogany), Black (ebony), and Cordovan
(plum). The Light Brown dye is exceptionally useful in matching the original
finish on high grade Charlatan and other pipes with a golden finish. Brown (or
medium brown) works best on red and maroon pipes. By using several coats, you
can match most red finishes. Dark Brown is true brown dye that will renew
'walnut' finish Pipes. Black can produce a superb ebony color with a little
practice, but it really shows its stuff when touching up black sandblasts.
Shoe dye can be used not only for touchup,
but also to totally refinish a pipe. Let's say, for example, say you are
overstocked with dozens of house-brand walnut pipes that just don’t sell.
Apply a little elbow grease, and 320 grit sandpaper to remove the old finish.
Then stain the pipes with shoe dye. Vary the color and number of coats to
produce a variety of finishes. Then sit back and let your customers tell you
which one to stick with. Leave the pipe unpolished for a matt finish, or buff
and wax to a high gloss. The choices are yours.
Another variation of this technique
involves the use of a Dremel Moto-Tool. If after sanding down one of your no-names
you discover fills, don't fret. You can use the Dremel's high-speed cutting
tips to carve out the weak areas of the bowl. By using assorted cutters, you
can create a nice panel effect such as found on the Karl Erikand Micoli pipes.
Develop your technique on scrap lumber before tackling briar.
To create a carved two-tone effect, first
stain the entire pipe with one of the brown dyes. Next, stain only the carved
area with black dye. Now polish the pipe on a buffer, only the low spots of the
carving will remain black. The trick to this technique is to develop an
interesting texture to the carving. BE consistent from pipe to pipe.
This may sound like an awful lot of work just
to sell a second, but you will be creating salable merchandise from your real
dogs. I don't recommend this technique on brand name pipes, as I am sure that
your sales rep would have heart attack on his next visit. By practicing on your
losers, you will become ready for the next phase of the pipe restorer's art --
antique briars.
Pre-transition Barlings and Dunhill ODA's
are among the most sought after pipes in the "used wood" market. Many
pipe stores are discovering the value of dealing in "estate pipes.”
Rarely do these pipes arrive in the shop in pristine condition. Often a pipe
will show scratches and dings around the mouth of the bowl. The finish may be
uneven, or even nonexistent. Occasionally one may show heavy damage, such as a
chipped bowl or cigarette burns.
Restoring the finish on valuable pipes
is risky. Many repair shops won't offer this service for this reason. It
might be worth the risk, since the better the finish on a "previously
owned" pipe, the easier it is to sell. Even if you do not refinish pipes,
yourself, it is valuable to know how it can be done.
Minor burns and scratches can often be
handled in our own shop with a little sandpaper and shoe dye. Even the tops of
badly worn bowls can be sanded flat, and then shaped to match the original
contour of the bowl. This technique will work on most smooth finish pipes as
long as you don't remove too much wood. Avoid sanding the pipe near the stamped
trademarks, if possible.
Quite often the pipe will have the
surface varnish missing. Despite the party line, most manufacturers do use an
oil finish on many of their pipes. This is not spar varnish, polyurethane, or
shellac (although shellac stains are used in 'drugstore’ pipes). The best
varnish available to the tobacconist is Formby's Tung Oil.
Remove what's left of the old varnish with an
acetone soaked cloth. Then evenly stain and polish the pipe. Apply the Tung
Oil, using several light coats. Finally, use our loose buffing wheel to apply a
light coat of carnauba wax. Remember, despite what the reps may tell you, the
varnish is applied under the wax, not over it.
Refinishing antique meerschaum pipes is
beyond the scope of this article. If you are interested, I'll suggest studying
Ben Rapaport's excellent book, Complete Guide to Collecting Antique Pipes (Schiffer Publishing, Box E, Exton, PA 19341). In chapter 11, my colleague and mentor, Doug Murphy, discusses
meerschaum refinishing in detail.
Learning the techniques of pipe
restoration will broaden the scope of services that you can offer your
customers. Service is the key word of the success of a modern smoke shop. Even
if you prefer to use the services of a repair shop, you can earn extra income for
your shop by recommending restoration to your customers.
A final word to the wise; Practice with
pipes from your reject bin before you attempt to restore your customer’s
favorite pipe.